SpringCloud
2021-12-20 大约 16 分钟
# SpringCloud
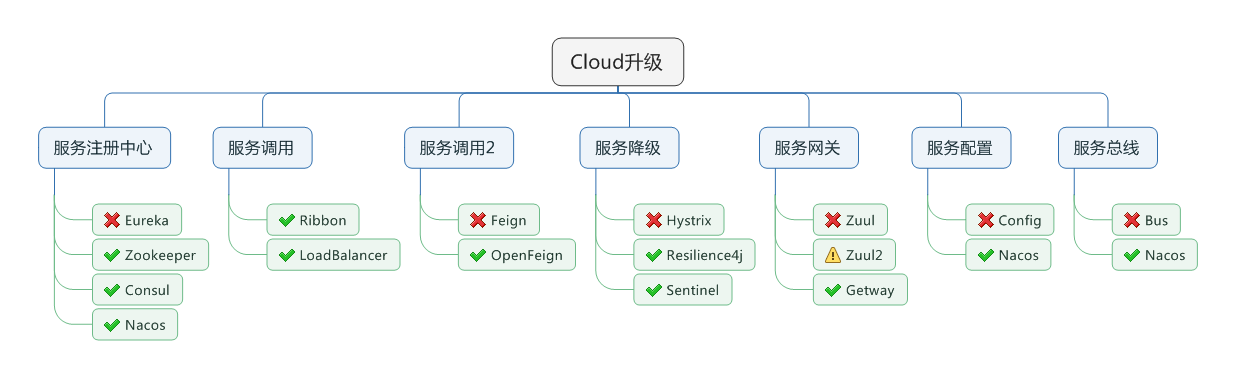
# Cloud升级
# Eureka(注册中心)
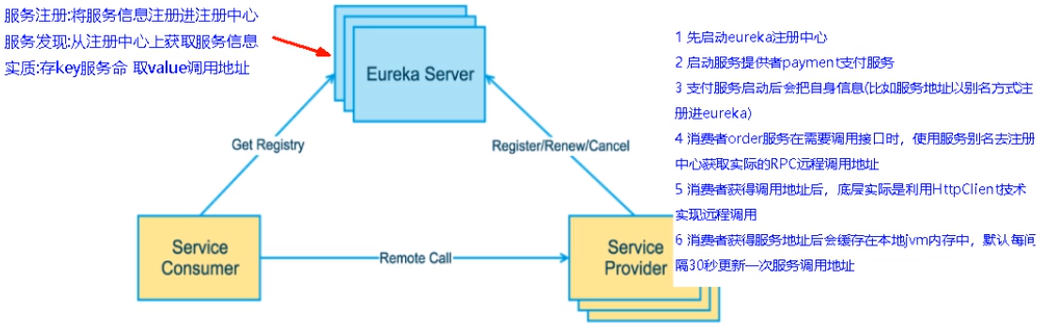
- 作用:将服务的提供方和调用方注册到服务中心
- 主要配置
# 注册中心 @EnableEurekaServer
server:
  port: 7001
eureka:
  instance:
    hostname: locathost # eureka服务端的实例名称
  client:
    # false表示不向注册中心注册自己。
    register-with-eureka: false
    # false表示自己端就是注册中心,我的职责就是维护服务实例,并不需要去检索服务
    fetch-registry: false
    service-url:
      # 设置与Eureka server交互的地址查询服务和注册服务都需要依赖这个地址。
      defaultZone: http://localhost:7001/eureka/
    server:
      # 关闭自我保护机制,保证不可用服务立即被踢出
      enable-self-preservation: false
      eviction-interval-timer-in-ms: 2000

# 客户端 @EnableEurekaClient
spring:
  application:
    name: cloud-payment-service
eureka:
  client:
    # 表示是否将自己注册进Eurekaserver默认为true。
    register-with-eureka: true
    # 是否从EurekaServer抓取已有的注册信息,默认为true。单节点无所谓,集群必须设置为true才能配合ribbon使用负载均衡
    fetchRegistry: true
    service-url:
      defaultZone: http://localhost:7001/eureka
  instance:
  	# eureka主页实例显示修改
    ip-address: 127.0.0.1
    instance-id: payment8001
    prefer-ip-address: true
    # Eureka客户端向服务端发送心跳的时间间隔,单位为秒(默认是30秒)
    lease-renewal-interval-in-seconds: 1
    # Eureka服务端在收到最后一次心跳后等待时间上限,单位为秒(默认是90秒),超时将剔除服务
    lease-expiration-duration-in-seconds: 2
1
2
3
4
5
6
7
8
9
10
11
12
13
14
15
16
17
18
19
20
21
22
23
24
25
26
27
28
29
30
31
32
33
34
35
36
37
38
39
40
41
2
3
4
5
6
7
8
9
10
11
12
13
14
15
16
17
18
19
20
21
22
23
24
25
26
27
28
29
30
31
32
33
34
35
36
37
38
39
40
41
- 服务发现配置
// @EnableDiscoveryClient
@Resource
private DiscoveryClient discoveryClient;
// 查所有服务名,例子:cloud-payment-service
List<String> services = discoveryClient.getServices();
// 查查所有服务名对应的所有实例名
List<ServiceInstance> instances = discoveryClient.getInstances("CLOUD-PAYMENT-SERVICE");
for (ServiceInstance instance : instances) {
    log.info(instance.getServiceId()+"/t"+instance.getHost()+"/t"+instance.getPort()+"/t"+instance.getUri());
}
1
2
3
4
5
6
7
8
9
10
2
3
4
5
6
7
8
9
10
# ZooKeeper
- 配置:
spring:
  application:
    name: cloud-provider-payment
  cloud:
    zookeeper:
      connect-string: 127.0.0.1:2181 # 192.168.111.144:2181 #
1
2
3
4
5
6
2
3
4
5
6
- ZooKeeper的服务节点是临时节点
# Consul
- 配置
spring:
  application:
    name: consul-provider-payment
# consul注册中心地址
  cloud:
    consul:
      host: localhost
      port: 8500
      discovery:
        #hostname: 127.0.0.1
        service-name: ${spring.application.name}
1
2
3
4
5
6
7
8
9
10
11
2
3
4
5
6
7
8
9
10
11
CAP理论的核心是:一个分布式系统不可能同时很好的满足一致性,可用性和分区容错性这三个需求。Eureka:AP,Consul,Zookeeper:CP
- C:Consistency (强一致性)
- A:Availability (可用性)
- P:Partition tolerance (分区容错性)
# Robbin(负载均衡):
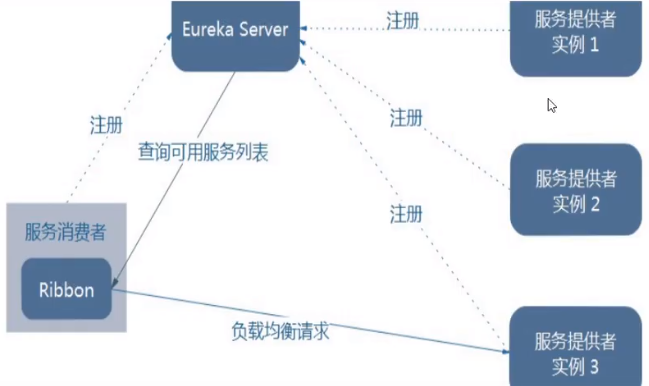
- 使用方法:eureka内置robbin组件,在消费方RestTemplate加上LoadBalanced注解即可
@RibbonClient(name = "CLOUD-PAYMENT-SERVICE",configuration = MyselfRule.class)
public class OrderMain80 {
    public static void main(String[] args) {
        SpringApplication.run(OrderMain80.class,args);
    }
}
1
2
3
4
5
6
2
3
4
5
6
或者直接配置
user-service: consul-provider-payment
  ribbon:
    NFLoadBalancerRuleClassName: com.netflix.loadbalancer.RandomRule
1
2
3
2
3
# Feign&&OpenFeign(服务调用)
- Feign是Spring Cloud组件中的一个轻量级RESTful的HTTP服务客户端Feign内置了Ribbon,用来做客户端负载均衡,去调用服务注册中心的服务。Feign的使用方式是:使用Feign的注解定义接口,调用这个接口,就可以调用服务注册中心的服务。
- OpenFeign是Spring Cloud在Feign的基础上支持了SpringMVC的注解,如@RequesMapping等等。OpenFeign的@Feignclient可以解析SpringMVC的@RequestMapping注解下的接口,并通过动态代理的方式产生实现类,实现类中做负载均衡并调用其他服务。
@SpringBootApplication
@EnableFeignClients
public class OrderFeignMain80 {
    public static void main(String[] args) {
        SpringApplication.run(OrderFeignMain80.class, args);
    }
}
// 客户端使用
@Component
// 内置了Ribbon
@FeignClient(value = "CLOUD-PAYMENT-SERVICE")
public interface PaymentFeignService{
    // 函数转成接口调用:http://CLOUD-PAYMENT-SERVICE/payment/get/{id}
    @GetMapping(value = "/payment/get/{id}")
    public CommonResult<Payment> getPaymentById(@PathVariable("id") Long id);

}
1
2
3
4
5
6
7
8
9
10
11
12
13
14
15
16
17
2
3
4
5
6
7
8
9
10
11
12
13
14
15
16
17
- 超时配置
# 设置feign客户端超时时间(OpenFeign默认支持ribbon)(单位:毫秒)
ribbon:
  # 指的是建立连接所用的时间,适用于网络状况正常的情况下,两端连接所用的时间
  ReadTimeout: 5000
  # 指的是建立连接后从服务器读取到可用资源所用的时间
  ConnectTimeout: 5000
1
2
3
4
5
6
2
3
4
5
6
- OpenFeign日志增强:对Feign接口的调用情况进行监控和输出
- NONE:默认的,不显示任何日志;
- BASIC:仅记录请求方法、URL、响应状态码及执行时间;
- HEADERS:除了BASIC中定义的信息之外,还有请求和响应的头信息;
- FULL:除了HEADERS中定义的信息之外,还有请求和响应的正文及元数据
@Configuration
public class FeignConfig
{
    @Bean
    Logger.Level feignLoggerLevel()
    {
        return Logger.Level.FULL;
    }
}
1
2
3
4
5
6
7
8
9
2
3
4
5
6
7
8
9
logging:
  level:
    # feign日志以什么级别监控哪个接口
    com.lun.springcloud.service.PaymentFeignService: debug
1
2
3
4
2
3
4
# Hystrix(服务熔断降级)
- 作用:
- 降级:服务器忙,请稍后再试,不让客户端等待并立刻返回一个友好提示
- 熔断:类比保险丝达到最大服务访问后,直接拒绝访问,拉闸限电,然后调用服务降级的方法并返回友好提示
- 限流:秒杀高并发等操作,严禁一窝蜂的过来拥挤,大家排队,一秒钟N个,有序进行
服务降级:
@EnableHystrix//EnableHystrix包含EnableCircuitBreaker注解
public class PaymentHystrixMain8001{
    public static void main(String[] args) {
            SpringApplication.run(PaymentHystrixMain8001.class, args);
    }
}

// 全局服务降级
@DefaultProperties(defaultFallback = "payment_Global_FallbackMethod")
public class OrderHystirxController {
	// 单独配置
    @HystrixCommand(fallbackMethod = "paymentTimeOutFallbackMethod",commandProperties = {
        @HystrixProperty(name="execution.isolation.thread.timeoutInMilliseconds",value="1500")
    })
    public String paymentInfo_TimeOut(Integer id){
        ....
    }
    public String paymentTimeOutFallbackMethod(Integer id){
        ...
    }

    // 使用全局服务降级
    @HystrixCommand
    public String payment_Global_FallbackMethod(){
        ...
    }

    public String payment_Global_FallbackMethod(){
        ...
    }
}
1
2
3
4
5
6
7
8
9
10
11
12
13
14
15
16
17
18
19
20
21
22
23
24
25
26
27
28
29
30
31
2
3
4
5
6
7
8
9
10
11
12
13
14
15
16
17
18
19
20
21
22
23
24
25
26
27
28
29
30
31
- 消费方结合Feign:
#开启
feign:
  hystrix:
    enabled: true
1
2
3
4
2
3
4
@FeignClient(value = "CLOUD-PROVIDER-HYSTRIX-PAYMENT",
             fallback = PaymentFallbackHystrixService.class)
public interface PaymentHystrixService {
    @GetMapping("/payment/hystrix/ok/{id}")
    public String paymentInfo_OK(@PathVariable("id") Integer id);

    @GetMapping("/payment/hystrix/timeout/{id}")
    public String paymentInfo_TimeOut(@PathVariable("id") Integer id);
}

// 回调类
public class PaymentFallbackHystrixService implements PaymentHystrixService {
    @Override
    public String paymentInfo_OK(Integer id) {
       ...
    }

    @Override
    public String paymentInfo_ERROR(Integer id) {
       ...
    }
}
1
2
3
4
5
6
7
8
9
10
11
12
13
14
15
16
17
18
19
20
21
22
23
2
3
4
5
6
7
8
9
10
11
12
13
14
15
16
17
18
19
20
21
22
23
服务熔断:熔断打开,半开,关闭
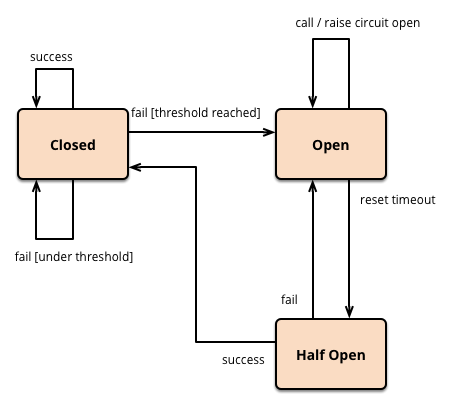
- 配置描述:10秒内id为负数超过6次,就打开 熔断器,即使正确也返回错误信息,然后慢慢关闭断路器
public class PaymentService{
    @HystrixCommand(fallbackMethod = "paymentCircuitBreaker_fallback",commandProperties = {
            @HystrixProperty(name = "circuitBreaker.enabled",value = "true"),// 是否开启断路器
            @HystrixProperty(name = "circuitBreaker.requestVolumeThreshold",value = "10"),// 请求次数超过10次才开启熔断功能
            @HystrixProperty(name = "circuitBreaker.sleepWindowInMilliseconds",value = "10000"), // 时间窗口期
            @HystrixProperty(name = "circuitBreaker.errorThresholdPercentage",value = "60"),// 失败率达到多少后跳闸
    })
    public String paymentCircuitBreaker(@PathVariable("id") Integer id) {
        if(id < 0) {
            throw new RuntimeException("******id 不能负数");
        }
        String serialNumber = IdUtil.simpleUUID();

        return Thread.currentThread().getName()+"/t"+"调用成功,流水号: " + serialNumber;
    }
    public String paymentCircuitBreaker_fallback(@PathVariable("id") Integer id) {
        return "id 不能负数,请稍后再试,/(ㄒoㄒ)/~~   id: " +id;
    }

}
1
2
3
4
5
6
7
8
9
10
11
12
13
14
15
16
17
18
19
20
2
3
4
5
6
7
8
9
10
11
12
13
14
15
16
17
18
19
20
- 图形化Dashboard微服务搭建
@SpringBootApplication
@EnableHystrixDashboard
public class HystrixDashboardMain9001
{
    public static void main(String[] args) {
        SpringApplication.run(HystrixDashboardMain9001.class, args);
    }
}
1
2
3
4
5
6
7
8
2
3
4
5
6
7
8
# Zuul(网关)
Zuul1使用
@EnableZuulProxy来启动组件,配置pre和route将服务名转成url
自定义过滤器继承ZuulFilter实现
- shouldFilter:返回一个Boolean值,判断该过滤器是否需要执行。返回true执行,返回false不执行。
- run:过滤器的具体业务逻辑。
- filterType:返回字符串,代表过滤器的类型。包含以下4种:
- pre:请求在被路由之前执行
- routing:在路由请求时调用
- post:在routing和errror过滤器之后调用
- error:处理请求时发生错误调用
- filterOrder:通过返回的int值来定义过滤器的执行顺序,数字越小优先级越高
# Gateway
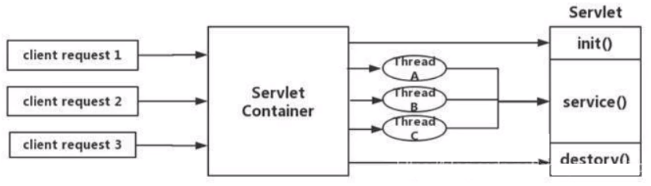
Zuul1.x模型:一个请求,Servlet container就会为其绑定一个线程
Gateway模型:使用WebFlux中的响应式编程组件,底层集成了Netty
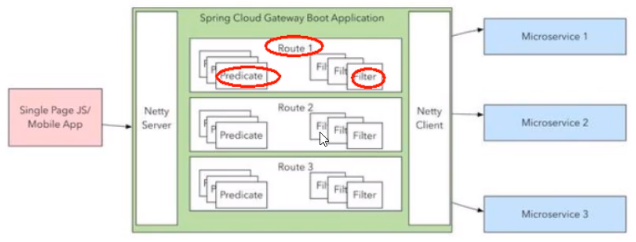
核心概念:
- Route(路由) - 路由是构建网关的基本模块,它由ID,目标URI,一系列的断言和过滤器组成,如断言为true则匹配该路由
- Predicate(断言) - 参考Java8的java.util.function.Predicate,匹配HTTP请求中的所有内容(例如请求头或请求参数),如果请求与断言相匹配则进行路由;
- Filter(过滤) - 指的是Spring框架中GatewayFilter的实例,使用过滤器,可以在请求被路由前或者之后对请求进行修改。
配置
spring:
  application:
    name: cloud-gateway
  cloud:
    gateway:
      discovery:
        locator:
          enabled: true #开启从注册中心动态创建路由的功能,利用微服务名进行路由
      routes:
        - id: payment_routh #payment_route    #路由的ID,没有固定规则但要求唯一,建议配合服务名
          uri: lb://cloud-payment-service #匹配后提供服务的路由地址,lb表示在微服务中自动为我们创建的负载均衡uri。
          predicates:
            - Path=/payment/get/**         # 断言,路径相匹配的进行路由

        - id: payment_routh2 #payment_route    #路由的ID,没有固定规则但要求唯一,建议配合服务名
          uri: lb://cloud-payment-service #匹配后提供服务的路由地址
          predicates:
            - Path=/payment/lb/**         # 断言,路径相匹配的进行路由
1
2
3
4
5
6
7
8
9
10
11
12
13
14
15
16
17
18
2
3
4
5
6
7
8
9
10
11
12
13
14
15
16
17
18
- 常见Predicate
spring:
  cloud:
    gateway:
      routes:
      - id: after_route
        uri: https://example.org
        predicates:
        # 时间后才能起效
        - After=2017-01-20T17:42:47.789-07:00[America/Denver]
        - Between=2017-01-20T17:42:47.789-07:00[America/Denver], 2017-01-21T17:42:47.789-07:00[America/Denver]
        # cookie头内容:"chocolate=chip"
        - Cookie=chocolate, ch.p
        # 带请求头 "X-Request-Id:123"
        - Header=X-Request-Id, /d+
1
2
3
4
5
6
7
8
9
10
11
12
13
14
2
3
4
5
6
7
8
9
10
11
12
13
14
- Filte
- 主要接口:GlobalFilter,Ordered
- 作用:统一网关鉴权,全局日志等
- 生命周期:pre,post
# Config(配置中心)
- 原理:

- 服务端微服务@EnableConfigServer
server:
  port: 3344

spring:
  application:
    name:  cloud-config-center #注册进Eureka服务器的微服务名
  cloud:
    config:
      server:
        git:
          uri: git@github.com:zzyybs/springcloud-config.git #GitHub上面的git仓库名字
        ####搜索目录
          search-paths:
            - springcloud-config
      ####读取分支
      label: master
1
2
3
4
5
6
7
8
9
10
11
12
13
14
15
16
2
3
4
5
6
7
8
9
10
11
12
13
14
15
16
- 客户端bootstrap
server:
  port: 3355

spring:
  application:
    name: config-client
  cloud:
    #Config客户端配置
    config:
      label: master #分支名称
      name: config #配置文件名称
      profile: dev #读取后缀名称   上述3个综合:master分支上config-dev.yml的配置文件被读取http://config-3344.com:3344/master/config-dev.yml
      uri: http://localhost:3344 #配置中心地址k
1
2
3
4
5
6
7
8
9
10
11
12
13
2
3
4
5
6
7
8
9
10
11
12
13
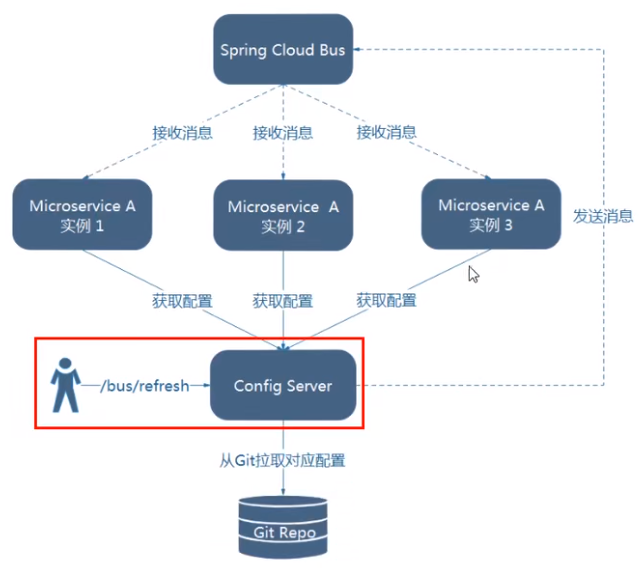
- 问题点:github上配置文件的修改,客户端需要重启服务才能感知到,需要配置bus来实现自动修改
# Bus(总线)
- 原理:利用消息总线触发一个服务端ConfigServer的/bus/refresh端点,而刷新所有客户端的配置
- 客户端配置
server:
  port: 3366 #还有一个客户端3355,同样的配置

spring:
  application:
    name: config-client
  cloud:
    #Config客户端配置
    config:
      label: master #分支名称
      name: config #配置文件名称
      profile: dev #读取后缀名称   上述3个综合:master分支上config-dev.yml的配置文件被读取http://config-3344.com:3344/master/config-dev.yml
      uri: http://localhost:3344 #配置中心地址

#rabbitmq相关配置 15672是Web管理界面的端口;5672是MQ访问的端口
  rabbitmq:
    host: localhost
    port: 5672
    username: guest
    password: guest
# 暴露监控端点,需要spring-boot-starter-actuator,post请求时能被访问到
management:
  endpoints:
    web:
      exposure:
        include: "*"
1
2
3
4
5
6
7
8
9
10
11
12
13
14
15
16
17
18
19
20
21
22
23
24
25
26
2
3
4
5
6
7
8
9
10
11
12
13
14
15
16
17
18
19
20
21
22
23
24
25
26
- 服务端配置
server:
  port: 3344

spring:
  application:
    name:  cloud-config-center #注册进Eureka服务器的微服务名
  cloud:
    config:
      server:
        git:
          uri: git@github.com:zzyybs/springcloud-config.git #GitHub上面的git仓库名字
        ####搜索目录
          search-paths:
            - springcloud-config
      ####读取分支
      label: master
#rabbitmq相关配置<--------------------------
rabbitmq:
    host: localhost
    port: 5672
    username: guest
    password: guest

#服务注册到eureka地址
eureka:
  client:
    service-url:
      defaultZone: http://localhost:7001/eureka

##rabbitmq相关配置,暴露bus刷新配置的端点
management:
  endpoints: #暴露bus刷新配置的端点
    web:
      exposure:
        include: 'bus-refresh'
1
2
3
4
5
6
7
8
9
10
11
12
13
14
15
16
17
18
19
20
21
22
23
24
25
26
27
28
29
30
31
32
33
34
35
2
3
4
5
6
7
8
9
10
11
12
13
14
15
16
17
18
19
20
21
22
23
24
25
26
27
28
29
30
31
32
33
34
35
- 动态刷新
- 全局刷新:
curl -X POST "http://localhost:3344/actuator/bus-refresh" - 顶点刷新:
curl -X POST "http://localhost:3344/actuator/bus-refresh/config-client:3355"
- 全局刷新:
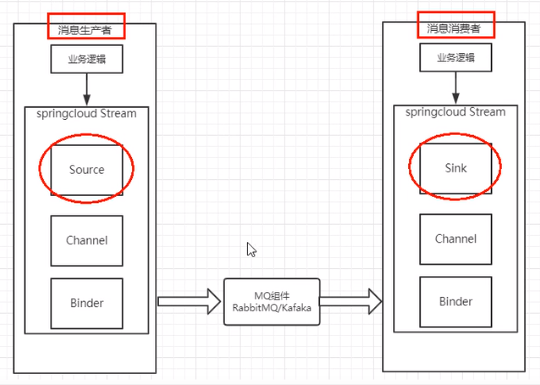
# Stream(消息队列)
- 目的:屏蔽底层消息中间件(目前之支持RabbitMQ和Kafka)的差异,统一消息的编程模型,
- 原理:
- Binder - 很方便的连接中间件,屏蔽差异。
- Channel - 通道,是队列Queue的一种抽象,在消息通讯系统中就是实现存储和转发的媒介,通过Channel对队列进行配置。
- Source和Sink - 简单的可理解为参照对象是Spring Cloud Stream自身,从Stream发布消息就是输出,接受消息就是输入。
- 生产者
server:
  port: 8801 # 还有一个8802消费者

spring:
  application:
    name: cloud-stream-provider
  cloud:
      stream:
        binders: # 在此处配置要绑定的rabbitmq的服务信息;
          defaultRabbit: # 表示定义的名称,用于于binding整合
            type: rabbit # 消息组件类型
            environment: # 设置rabbitmq的相关的环境配置
              spring:
                rabbitmq:
                  host: localhost
                  port: 5672
                  username: guest
                  password: guest
        bindings: # 服务的整合处理
          output: # 这个名字是一个通道的名称
            destination: studyExchange # 表示要使用的Exchange名称定义
            content-type: application/json # 设置消息类型,本次为json,文本则设置“text/plain”
            binder: defaultRabbit # 设置要绑定的消息服务的具体设置
1
2
3
4
5
6
7
8
9
10
11
12
13
14
15
16
17
18
19
20
21
22
23
2
3
4
5
6
7
8
9
10
11
12
13
14
15
16
17
18
19
20
21
22
23
import com.lun.springcloud.service.IMessageProvider;
import org.springframework.cloud.stream.annotation.EnableBinding;
import org.springframework.cloud.stream.messaging.Source;
import org.springframework.integration.support.MessageBuilder;
import org.springframework.messaging.MessageChannel;

import javax.annotation.Resource;
import java.util.UUID;


@EnableBinding(Source.class) //定义消息的推送管道
public class MessageProviderImpl implements IMessageProvider
{
    @Resource
    private MessageChannel output; // 消息发送管道

    @Override
    public String send()
    {
        String serial = UUID.randomUUID().toString();
        output.send(MessageBuilder.withPayload(serial).build());
        System.out.println("*****serial: "+serial);
        return null;
    }
}
1
2
3
4
5
6
7
8
9
10
11
12
13
14
15
16
17
18
19
20
21
22
23
24
25
2
3
4
5
6
7
8
9
10
11
12
13
14
15
16
17
18
19
20
21
22
23
24
25
- 消费者
server:
  port: 8802

spring:
  application:
    name: cloud-stream-consumer
  cloud:
      stream:
        binders: # 在此处配置要绑定的rabbitmq的服务信息;
          defaultRabbit: # 表示定义的名称,用于于binding整合
            type: rabbit # 消息组件类型
            environment: # 设置rabbitmq的相关的环境配置
              spring:
                rabbitmq:
                  host: localhost
                  port: 5672
                  username: guest
                  password: guest
        bindings: # 服务的整合处理
          input: # 这个名字是一个通道的名称
            destination: studyExchange # 表示要使用的Exchange名称定义
            content-type: application/json # 设置消息类型,本次为对象json,如果是文本则设置“text/plain”
            binder: defaultRabbit # 设置要绑定的消息服务的具体设置
1
2
3
4
5
6
7
8
9
10
11
12
13
14
15
16
17
18
19
20
21
22
23
2
3
4
5
6
7
8
9
10
11
12
13
14
15
16
17
18
19
20
21
22
23
import org.springframework.beans.factory.annotation.Value;
import org.springframework.cloud.stream.annotation.EnableBinding;
import org.springframework.cloud.stream.annotation.StreamListener;
import org.springframework.cloud.stream.messaging.Sink;
import org.springframework.messaging.Message;
import org.springframework.stereotype.Component;


@Component
@EnableBinding(Sink.class)
public class ReceiveMessageListenerController
{
    @Value("${server.port}")
    private String serverPort;


    @StreamListener(Sink.INPUT)
    public void input(Message<String> message)
    {
        System.out.println("消费者1号,----->接受到的消息: "+message.getPayload()+"/t  port: "+serverPort);
    }
}
1
2
3
4
5
6
7
8
9
10
11
12
13
14
15
16
17
18
19
20
21
22
2
3
4
5
6
7
8
9
10
11
12
13
14
15
16
17
18
19
20
21
22
存在问题:
- 重复消费问题:订单系统我们做集群部署,都会从RabbitMQ中获取订单信息,那如果一个订单同时被两个服务获取到,那么就会造成数据错误
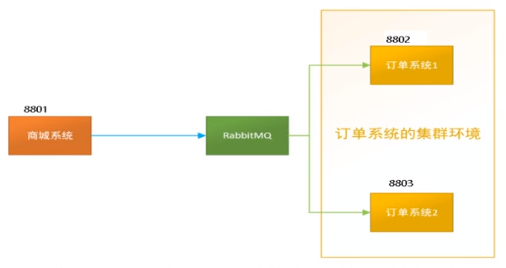
解决:将消费者分为同一组
spring:
  application:
    name: cloud-stream-provider
  cloud:
      stream:
        binders: # 在此处配置要绑定的rabbitmq的服务信息;
          defaultRabbit: # 表示定义的名称,用于于binding整合
            type: rabbit # 消息组件类型
            environment: # 设置rabbitmq的相关的环境配置
              spring:
                rabbitmq:
                  host: localhost
                  port: 5672
                  username: guest
                  password: guest
        bindings: # 服务的整合处理
          output: # 这个名字是一个通道的名称
            destination: studyExchange # 表示要使用的Exchange名称定义
            content-type: application/json # 设置消息类型,本次为json,文本则设置“text/plain”
            binder: defaultRabbit # 设置要绑定的消息服务的具体设置
            group: A_Group # 8003也为A_Group
1
2
3
4
5
6
7
8
9
10
11
12
13
14
15
16
17
18
19
20
21- 消息持久化问题:若未分组,重启消费服务无法消费mq中的消息,而分组后的消费方重启会消费消息
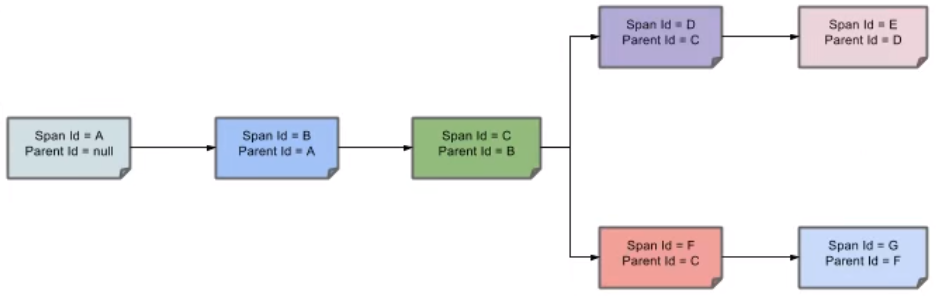
# Sleuth(链路追踪)
- 目的:用来查看微服务调用链路
- 名词解释
- Trace:类似于树结构的Span集合,表示一条调用链路,存在唯一标识
- span:表示调用链路来源,通俗的理解span就是一次请求信息
对应微服务:

- 使用:
- 构建Zipkin Server
java -jar zipkin-server-2.12.9-exec.jar - 配置:
- 构建Zipkin Server
spring:
  application:
    name: cloud-payment-service

  zipkin: #<-------------------------------------关键
      base-url: http://localhost:9411
  sleuth: #<-------------------------------------关键
    sampler:
    #采样率值介于 0 到 1 之间,1 则表示全部采集
    probability: 1

  datasource:
    type: com.alibaba.druid.pool.DruidDataSource            # 当前数据源操作类型
    driver-class-name: org.gjt.mm.mysql.Driver              # mysql驱动包
    url: jdbc:mysql://localhost:3306/db2019?useUnicode=true&characterEncoding=utf-8&useSSL=false
    username: root
    password: 123456
1
2
3
4
5
6
7
8
9
10
11
12
13
14
15
16
17
2
3
4
5
6
7
8
9
10
11
12
13
14
15
16
17
- 打开浏览器访问: http://localhost:9411
# Nacos(Eureka + Config + Bus)
- 配置:
# bootstrap @EnableDiscoveryClient
server:
  port: 3377

spring:
  application:
    name: nacos-config-client
  cloud:
    nacos:
      discovery:
        server-addr: localhost:8848 #Nacos服务注册中心地址
      config:
        server-addr: localhost:8848 #Nacos作为配置中心地址
        file-extension: yaml #指定yaml格式的配置
        group: DEV_GROUP
        namespace: 7d8f0f5a-6a53-4785-9686-dd460158e5d4
1
2
3
4
5
6
7
8
9
10
11
12
13
14
15
16
2
3
4
5
6
7
8
9
10
11
12
13
14
15
16
# application.yaml
spring:
  profiles:
    active: dev # 表示开发环境
1
2
3
4
2
3
4
import org.springframework.boot.SpringApplication;
import org.springframework.boot.autoconfigure.SpringBootApplication;
import org.springframework.cloud.client.discovery.EnableDiscoveryClient;


@EnableDiscoveryClient
@SpringBootApplication
public class NacosConfigClientMain3377
{
    public static void main(String[] args) {
        SpringApplication.run(NacosConfigClientMain3377.class, args);
    }
}
1
2
3
4
5
6
7
8
9
10
11
12
13
2
3
4
5
6
7
8
9
10
11
12
13
import org.springframework.beans.factory.annotation.Value;
import org.springframework.cloud.context.config.annotation.RefreshScope;
import org.springframework.web.bind.annotation.GetMapping;
import org.springframework.web.bind.annotation.RestController;

@RestController
@RefreshScope //支持Nacos的动态刷新功能。
public class ConfigClientController
{
    @Value("${config.info}")
    private String configInfo;

    @GetMapping("/config/info")
    public String getConfigInfo() {
        return configInfo;
    }
}
1
2
3
4
5
6
7
8
9
10
11
12
13
14
15
16
17
2
3
4
5
6
7
8
9
10
11
12
13
14
15
16
17
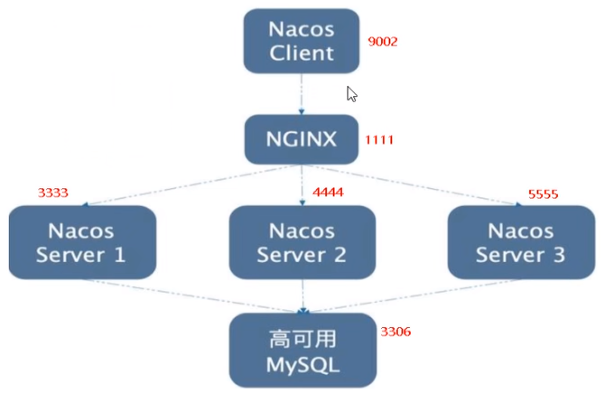
- 集群版:https://gitee.com/hub-mirrors/nacos-docker
# Sentinel(Hystrix)
- 配置:
server:
  port: 8401

spring:
  application:
    name: cloudalibaba-sentinel-service
  cloud:
    nacos:
      discovery:
        server-addr: localhost:8848 #Nacos服务注册中心地址
    sentinel:
      transport:
        dashboard: localhost:8858 #配置Sentinel dashboard地址
        port: 8719

management:
  endpoints:
    web:
      exposure:
        include: '*'

feign:
  sentinel:
    enabled: true # 激活Sentinel对Feign的支持
1
2
3
4
5
6
7
8
9
10
11
12
13
14
15
16
17
18
19
20
21
22
23
24
2
3
4
5
6
7
8
9
10
11
12
13
14
15
16
17
18
19
20
21
22
23
24
流控规则:
资源名:唯一名称,默认请求路径。
针对来源:Sentinel可以针对调用者进行限流,填写微服务名,默认default(不区分来源)。
阈值类型/单机阈值:
- QPS(每秒钟的请求数量)︰当调用该API的QPS达到阈值的时候,进行限流。
线程数:当调用该API的线程数达到阈值的时候,进行限流。
是否集群:不需要集群。
流控模式:
- 直接:API达到限流条件时,直接限流。
- 关联:当关联的资源达到阈值时,就限流自己。
- 链路:只记录指定链路上的流量(指定资源从入口资源进来的流量,如果达到阈值,就进行限流)【API级别的针对来源】。
流控效果:
快速失败:直接失败,抛异常。
Warm up:根据Code Factor(冷加载因子,默认3)的值,从阈值/codeFactor,经过预热时长,才达到设置的QPS阈值。
案例:阀值为10+预热时长设置5秒。系统初始化的阀值为10/ 3约等于3,即阀值刚开始为3,这时候qps超过3会报错。5秒后阀值才慢慢升高恢复到10
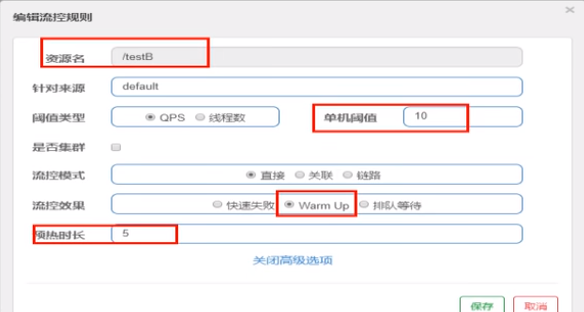
排队等待:匀速排队,让请求以匀速的速度通过,阈值类型必须设置为QPS,否则无效
案例:每秒1次请求,超过的话就排队等待,等待的超时时间为20000毫秒。

降级规则
RT(Round Time):平均响应时间
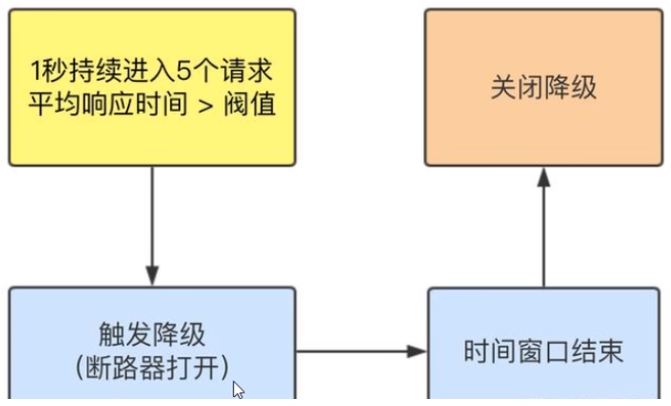

异常比例:当资源的每秒请求量 >= 5,并且每秒异常总数占通过量的比值超过阈值之后,资源进入降级状态
异常数:当资源近1分钟的异常数目超过阈值之后会进行熔断
热点规则:对传入的参数进行限流(常用)
系统规则:对整体进行限流
@SentinelResource(value = "byResource",blockHandlerClass = CustomerBlockHandler.class,blockHandler = "handleException",exceptionsToIgnore={Exception.class})
和openFien整合:关闭服务方,消费方自动降级,调用PaymentFallbackService同名方法
消费方配置
feign:
  sentinel:
    enabled: true
1
2
3@FeignClient(value = "nacos-payment-provider",fallback = PaymentFallbackService.class) public interface PaymentService { @GetMapping(value = "/paymentSQL/{id}") public CommonResult<Payment> paymentSQL(@PathVariable("id") Long id); }1
2
3
4
5
6持久化:可以直接关联nacos配置,微服务重启时不再配数据
spring:
  application:
    name: cloudalibaba-sentinel-service
  cloud:
    nacos:
      discovery:
        server-addr: localhost:8848 #Nacos服务注册中心地址
    sentinel:
      transport:
        dashboard: localhost:8080 #配置Sentinel dashboard地址
        port: 8719
      datasource: #<---------------------------关注点,添加Nacos数据源配置
        ds1:
          nacos:
            server-addr: localhost:8848
            dataId: cloudalibaba-sentinel-service
            groupId: DEFAULT_GROUP
            data-type: json
            rule-type: flow
1
2
3
4
5
6
7
8
9
10
11
12
13
14
15
16
17
18
19// 改配置可以通过sentinel配置完后发送的json请求获得 [{ "resource": "/rateLimit/byUrl", "IimitApp": "default", "grade": 1, "count": 1, "strategy": 0, "controlBehavior": 0, "clusterMode": false }]1
2
3
4
5
6
7
8
9
10
# Seata
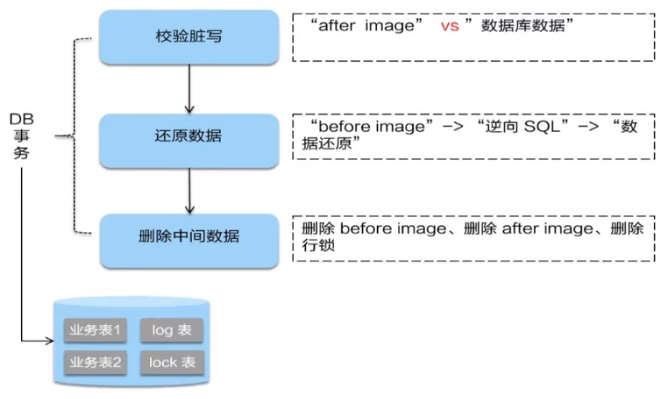
分布式事务处理过程的一ID+三组件模型:
- XID:全局唯一的事务ID
- TC(Transaction Coordinator):seata服务器
- TM (Transaction Manager):被@GlobalTransactional包围的代码
- RM (Resource Manager):数据库资源
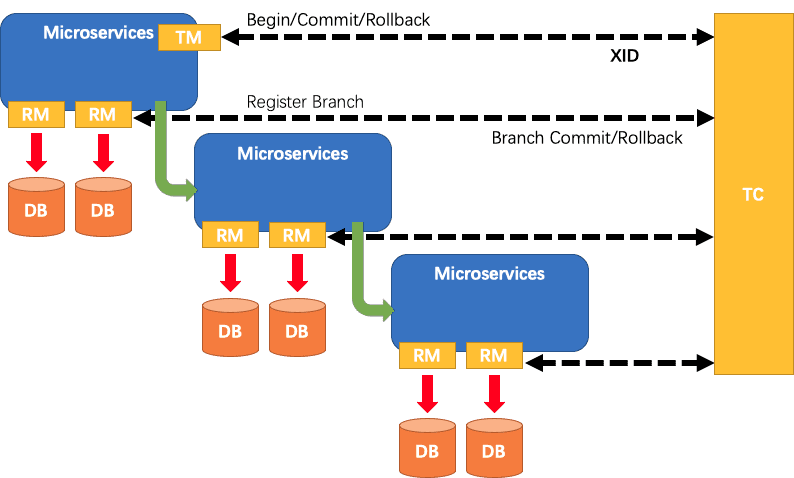
AT模式的执行流程
- 一阶段加载

- 二阶段提交
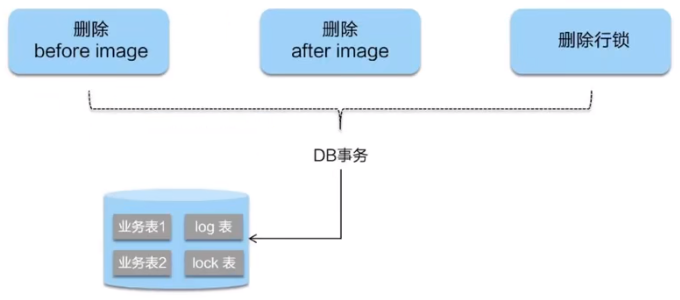
三阶段回滚